The simple email sample file in this chapter demonstrates how you can access the XML object model and work with XML data. A closer look at the document and its scripts reveals that simplicity comes with a cost. In an effort to keep the scripts on the easy side, some techniques have been incorporated that would prove to be less than ideal in many situations. Consider the following:
We will now look at some scripting techniques that will help us avoid some of the pitfalls just described.
While in the previous example the author was required to know the number and type of elements in the XML document, this situation can be easily avoided by using some other properties and methods in the XML object model. First let's take Code Listing 5-8 and replace the start function with the following code:
function start()
  {
  var newHTML = "";
  rootElem = xmlDoc.documentElement;
  for (el=0; el<rootElem.childNodes.length; el++)
    {
    alert(rootElem.childNodes.item(el).text);
    }
  }
|
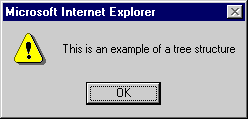
Loading the HTML file now should produce a series of five dialog boxes that contain the contents of the elements in the XML document, such as the dialog box shown below.
One of the changes made in the preceding code uses the object model (the property rootElem.childNodes.length) to ask the XML document how many child elements the root element contains. The script then enters a loop and walks through all the children of the root element, requesting the text contained in each element until the last one is reached. Now we don't need to know how many elements or child elements exist or their types. Since our document structure is simple, we need to use only one loop to access all of the content; you could do this looping as often as necessary to access all the elements and child elements in a more complex document. You can even find out if an element has children by using the childNodes property of an element. This property returns a value if children exist and returns null if they do not. (This and the many other parts of the XML object model are fully described in Appendix A.)
In this example, the value for each element is displayed in an alert box since we have no way of knowing which HTML tag should receive what data. Remember, we no longer know that a one-to-one relationship exists between XML document elements and HTML elements. We can work around this by having the script create the HTML elements on the fly. We'll change the body of the HTML document to the following:
<BODY> <DIV ID="content"> </DIV> </BODY> |
Quite a reduction! This works because we no longer require hard-coded elements to contain the content. We now need to add the script code that will create the HTML elements on the fly as the data is read from the XML document, by changing the start function to the following:
function start()
  {
  var newHTML = "";
  rootElem = xmlDoc.documentElement;

  for (el=0; el<rootElem.childNodes.length; el++)
    {
    if (el != rootElem.childNodes.length-1)
      {
      newHTML = newHTML +
        "<SPAN STYLE=`font-weight:bold;font-size:16'>" +
        rootElem.childNodes.item(el).nodeName +
        ": </SPAN><SPAN STYLE=`font-weight:normal'>" +
        rootElem.childNodes.item(el).text + "</SPAN><P>";
      }

   else
     {
     newHTML = newHTML +
       "<HR><SPAN STYLE=`font-weight:normal'>" +
       rootElem.childNodes.item(el).text + "</SPAN><P>";
     }
   }

 content.innerHTML = newHTML;
 }
|
This script code accomplishes several things. Each time the script encounters a new XML element, it creates a new HTML element that includes all the formatting information for that element. It then adds that element to the variable newHTML. The script also uses an if statement to test for the last element in the document. When the last element is reached, different formatting is applied. Finally, the script assigns the contents of the newHTML variable to the Div element named content. Since the variable newHTML contains valid HTML code, the page is displayed as we intended. Code Listing 5-9 (also in Chap05\Lst5_9.htm on the companion CD) shows the completed page with all of our changes.
Code Listing 5-9.
|
When you open this page, it should look like the one shown in Figure 5-4.
In Figure 5-4, you will notice that the document looks much like the document in Figure 5-3. The difference between the two is that here the HTML page is completely data independent. All the data is retrieved from the XML document, so that we can accomplish the same results with more flexible and compact code.
To further demonstrate this, let's add a Bcc element to the XML document Lst5_3.xml, as shown here.
<?xml version="1.0"?> <EMAIL> <TO>Jodie@msn.com</TO> <FROM>Bill@msn.com</FROM> <CC>Philip@msn.com</CC> <BCC>Naomi@microsoft.com</BCC> <SUBJECT>My document is a tree</SUBJECT> <BODY>This is an example of a tree structure</BODY> </EMAIL> |
Now when our sample HTML page is opened, the Bcc element is included in the document, even though no changes were made to the HTML code. The result is shown in Figure 5-5.
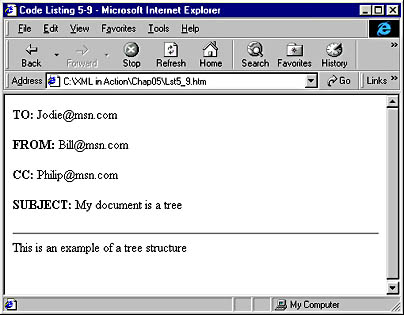
Figure 5-4. Displaying the XML document content.
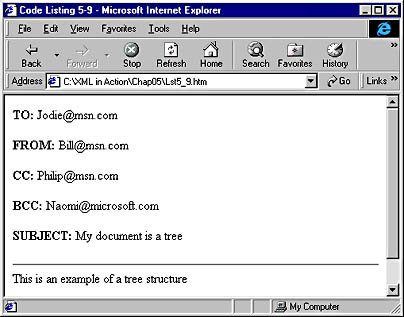
Figure 5-5. Adding an element to the XML document does not require a change in the HTML code.
This page is now completely data driven. Even so, the point of putting the data into HTML is to get the exact layout and formatting that we want for the data. As you might suspect, we still need to know quite a bit about what kind of data the XML document contains or we would not know how to apply the formatting. For example, the code tests for the last element in the XML document because we know that the last element is the body and should be formatted differently than other elements.
Note that while using these techniques can make an HTML document much more flexible and powerful, the document is still only a template for a specific class of XML document or documents. This makes HTML and XML perfect complements to one another.
Scripting is terrific when everything works, but it can be annoying, especially to the user, when problems occur. The XML object model provides several ways for authors to handle errors when they occur as a result of the XML document. One of these is the document object's parseError property, which provides information about problems that occur in an XML document so that authors can deal with them and users might not have to.
The parseError property provides a code for every error that occurs. An author can use these codes to:
The sample code below shows how the parseError property might be used to inform a user of a problem.
var xmlDoc = new ActiveXObject("microsoft.xmldom");
xmlDoc.load("Lst5_3.xml");

if (xmlDoc.parseError.reason == "")
  alert("Document loaded successfully");

else
  alert("The following error occurred: " +
    xmlDoc.parseError.errorCode)
|
This technique can be used both for debugging and for shielding users from errors. The document object and its many properties are covered in more detail in Appendix A.